- Community
- RUCKUS Technologies
- RUCKUS Lennar Support
- Community Services
- RTF
- RTF Community
- Australia and New Zealand – English
- Brazil – Português
- China – 简体中文
- France – Français
- Germany – Deutsch
- Hong Kong – 繁體中文
- India – English
- Indonesia – bahasa Indonesia
- Italy – Italiano
- Japan – 日本語
- Korea – 한국어
- Latin America – Español (Latinoamérica)
- Middle East & Africa – English
- Netherlands – Nederlands
- Nordics – English
- North America – English
- Poland – polski
- Russia – Русский
- Singapore, Malaysia, and Philippines – English
- Spain – Español
- Taiwan – 繁體中文
- Thailand – ไทย
- Turkey – Türkçe
- United Kingdom – English
- Vietnam – Tiếng Việt
- EOL Products
- RUCKUS Forums
- RUCKUS Technologies
- Cloud
- Re: DPSK for guest wifi
- Subscribe to RSS Feed
- Mark Topic as New
- Mark Topic as Read
- Float this Topic for Current User
- Bookmark
- Subscribe
- Mute
- Printer Friendly Page
- Mark as New
- Bookmark
- Subscribe
- Mute
- Subscribe to RSS Feed
- Permalink
- Report Inappropriate Content
02-10-2023 08:47 AM
hello,
I'd like to use DPSK for a guest wifi on the cloud controller;
I cannot import a csv with the accounts, as it always tell me "Upload failed:"
here a minimal file failing the upload:
#Username,Number of devices,MAC Address,Passphrase,VLAN ID,Passphrase Expiration
guest1,,,v4GHmqReY,,
guest2,,,r3GrzqRrT,,
how can I debug the problem? why does it fail?
PS is there a way to create DPSK via API (on the cloud controller)?
PPS: (this is for the WISHLIST) for guest wifi it would be great to have DPSK credentials wich expire X hours after the FIRST USE of the key (and not after some time from the CREATION of the key)
Solved! Go to Solution.
- Mark as New
- Bookmark
- Subscribe
- Mute
- Subscribe to RSS Feed
- Permalink
- Report Inappropriate Content
03-01-2023 09:43 AM - edited 03-01-2023 09:47 AM
Hi ebi, Thanks for your questions!
Please find the details below:
Upload failed when importing a csv with the DPSK Profiles
Make sure to follow the next formant in the .csv file:
The first row has a # only, the second row contains the column's name, then you can add the DPSK details.
If the issue persists try to recreate the DPSK Network.
Also, make sure the Passphrase matches with the format (Keyboard Friendly / Numbers Only / Most Secured) and length of your DPSK WLAN Configuration.
Create DPSK Profile(s) via API
Please follow the next steps (with Postman):
1. Generate the Token for API-KEY authentication click here
1.1. Copy the Payload from the documentation and enter your Cloud credentials:
1.2. Once you send the POST, you'll get your tenantId and API-KEY values:
2. Create the DPSK Profile(s) click here
2.1. Setup the API path, change the parameter {tenantId} with the tenantId you got on step 1.
2.2. Go to Authentication, change the Type to API Key.
2.2.1 - In the Key section set Token.
2.2.2 - In the Value section set the API-KEY you got on step1 as well.
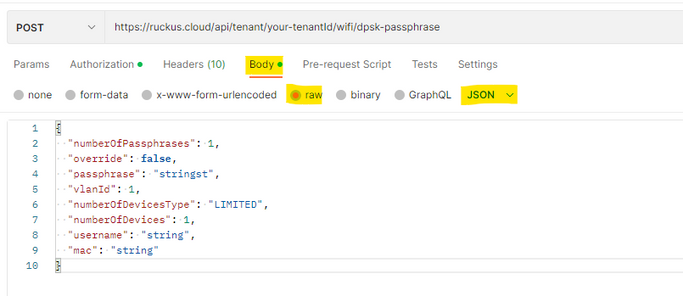
2.3. Go to Body, copy and past the Payload from the documentation
2.3.1 - Add the networkId in the Payload.
In order to know what the networkId is for your existing DPSK WLAN, you can use the API Get Networks click here
Once the API path and Authentication is setup, send the GET. In the Results JSON format, find your SSID and below you'll see its networkId example:
2.3.2. Now that you know the networkId, add it to the Payload (step 2.3) and complete the rest details how you'd like to create the DPSK Profile(s). Then send the POST, example:
Finally, refresh your Cloud Portal and you'll see the DPSK Profile(s) created.
- Mark as New
- Bookmark
- Subscribe
- Mute
- Subscribe to RSS Feed
- Permalink
- Report Inappropriate Content
03-03-2023 02:52 AM
your suggestion did solve my problem!
I did add the empty comment in the first line (it does not appare on the template we can download from the ruckus cloud interface) and I was able to import the file 🙂
I will switch to the API as soon as I will have time to implement them in our reception portal.
thanks!
- Mark as New
- Bookmark
- Subscribe
- Mute
- Subscribe to RSS Feed
- Permalink
- Report Inappropriate Content
03-03-2023 06:47 AM
Great! Glad to know your problem is solved 😉


